Raised-Heel Trusses at 15 Inches: Full-Depth Attic Insulation and Ice-Dam Defense
A practical guide to raised-heel (energy-heel) trusses that preserve full insulation thickness at the eaves, boost attic ventilation, and slash ice-dam risk—without changing your floor plan or roofline.
- A taller truss heel preserves full R-value at the eaves, a major weak spot in typical roofs.
- Simple detailing—baffles, blocking, and air sealing—turns a code-minimum roof into high performance.
- Costs are modest and pay back through energy savings, longer roof life, and fewer ice-dam repairs.
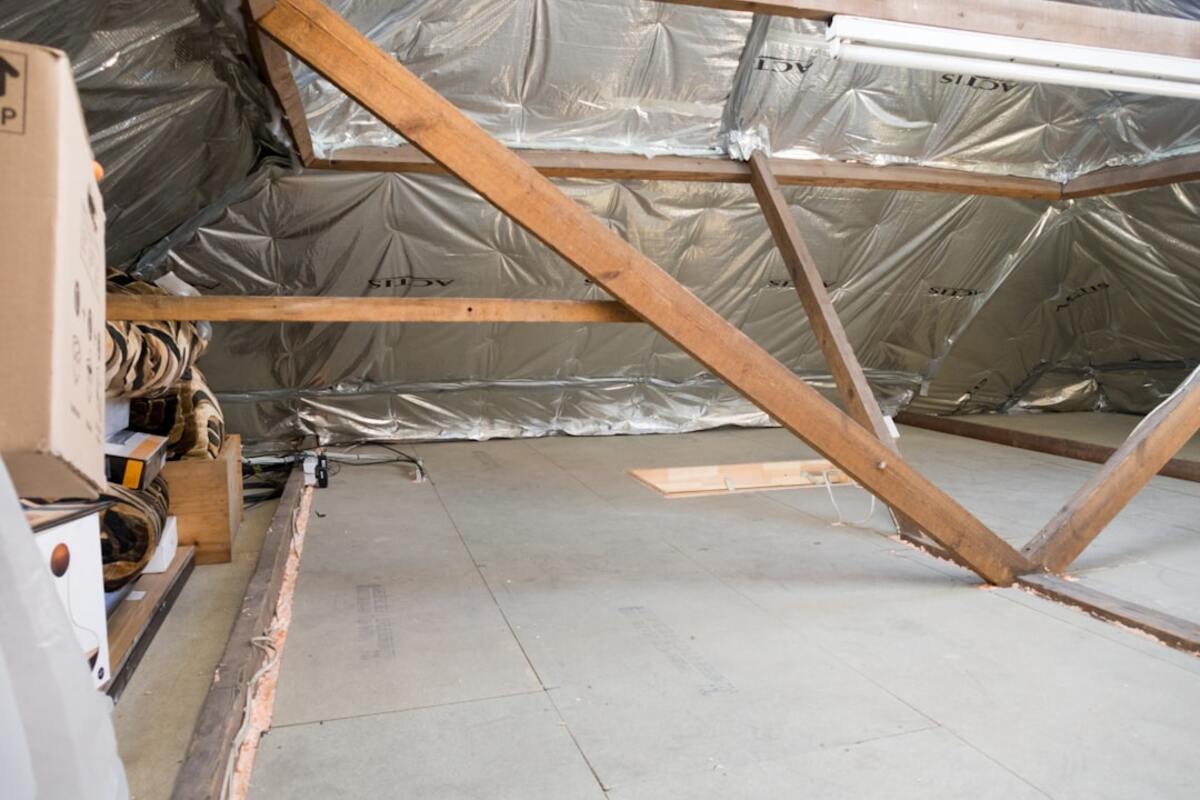
Most roof systems lose performance at the very edge—right where the roof meets the walls. Conventional trusses taper down at the eaves, compressing insulation to a fraction of its rated thickness. That skinny band of insulation becomes a cold bridge in winter, a heat leak in summer, and—when snow is involved—a prime spot for ice dams to form. A simple structural tweak changes that: raised-heel trusses, sometimes called energy-heel trusses. By specifying a heel height of 12 to 16 inches (or more), you keep full insulation depth over the exterior walls and maintain a clear ventilation path. The result: better comfort, higher real-world R-values, and a more durable roof.
Builders increasingly turn to raised-heel trusses because they are easy to specify, straightforward to install, and accepted by truss plants almost everywhere. When combined with air-tight ceiling details and a proper ventilation strategy, the energy-heel detail takes an ordinary attic and makes it a strong performer in any climate zone.
Why a raised heel changes everything
Insulation needs room to do its job. At a typical eave, the truss top chord slopes down until it nearly touches the top plate. Even with a vent baffle installed, there is often only an inch or two of remaining space for insulation—nowhere near the 10 to 16 inches needed for modern code-level R-values. Over a 100-foot eave, that thin band becomes a major area of heat loss.
A raised-heel truss adds vertical height at the bearing point so the insulation can remain full thickness all the way to the exterior wall. This preserves the insulation’s labeled R-value and creates a continuous thermal blanket that aligns with your wall insulation. The raised heel also leaves room for a continuous baffle, ensuring soffit-to-ridge airflow doesn’t get pinched off by insulation.
From a building science standpoint, this detail solves three linked problems: thermal bridging, air movement, and moisture accumulation. Less heat escaping at the eaves means fewer melt-freeze cycles and less risk of ice dams. A consistent, open ventilation channel keeps roof sheathing dry and extends shingle life. Finally, because you can detail the attic floor air barrier without contortions at the eave, the ceiling plane becomes tighter and easier to inspect.
Truss plants can typically add the heel height with no change to your roof pitch or plan layout. The profile simply grows vertically at the bearing point, and the plant adjusts webbing and plates to maintain structural capacity. In wind and seismic regions, engineers may specify additional blocking or mechanical connections at the bearing, but the field work stays simple—block, seal, insulate, ventilate.
Detailing and installation: step-by-step
Good performance from raised-heel trusses doesn’t come from height alone; it comes from a few small but crucial details at the eave and ceiling plane. The following sequence pairs field-proven steps with simple on-site checks that keep the process predictable.
1) Order the right heel height. Coordinate with your designer and truss manufacturer to specify a heel that matches your target R-value without compressing insulation. For most fiberglass or cellulose attics, 12 to 16 inches works well; high R-value assemblies or northern zones often benefit from 15 inches or more. Confirm that the clear ventilation space (often 1 to 2 inches) is preserved even after baffles are installed.
2) Install continuous baffles before insulating. Staple rigid or semi-rigid ventilation baffles from the soffit vent up past the insulation line. Extend them at least 6 to 12 inches beyond the eventual top of the insulation to prevent wind washing. Foam or fiberboard baffles are common; durable site-built baffles from thin plywood or rigid foam are also excellent, especially in high-wind areas.
3) Create a wind-wash dam at the eave. At each rafter bay, install a vertical dam (plywood, OSB, or rigid foam) just inboard of the exterior wall line, sealed to the top plate and roof deck. This dam stops cold exterior air from skimming across the top of insulation, which can erode R-value at the edges. Seal edges with compatible sealant or foam to keep the air barrier intact.
4) Air seal the ceiling plane thoroughly. Before insulation goes in, seal every top-plate to drywall intersection, mechanical penetration, and fixture housing. Use gaskets at can lights (or better, use surface-mounted fixtures below the air barrier), acoustic sealant at drywall perimeters, and spray foam at large gaps. If you’re using an interior smart vapor retarder membrane, detail it continuously with taped seams and sealed penetrations.
5) Insulate to full depth. Install insulation to the specified depth across the entire attic floor. With the raised heel and wind-wash dam in place, you can carry full thickness right to the edge without compression. Blown-in cellulose or fiberglass typically performs best for uniform coverage; batt insulation can also work when carefully fit and fluffed to the correct loft at the perimeter.
6) Vent the roof consistently. Provide balanced soffit and ridge venting (or other approved intake and exhaust combinations) sized per code and manufacturer guidance. The raised heel simplifies this because the baffle stays open, but ensure soffit vents aren’t painted shut, blocked by insulation, or undersized.
7) Inspect before closing up. Take photos showing continuous baffles, sealed dams, and air sealing details. Verify insulation depth with rulers placed throughout the attic, including at the eaves, and record coverage for your documentation. These simple steps support code compliance and quality control.
Materials checklist
- Raised-heel trusses (12–16 inch heel, per design)
- Vent baffles (rigid foam, plastic, or site-built)
- Wind-wash dams (OSB, plywood, or rigid foam strips)
- Sealants: acoustical sealant, polyurethane caulk, gun foam
- Air barrier components: taped drywall, gaskets, smart vapor retarder (optional)
- Blown insulation (cellulose or fiberglass) or high-loft batts
- Fasteners: staples, nails, approved adhesives for foam-to-wood
As you implement these details, remember that each piece reinforces the others. A tall heel without a wind-wash dam can still suffer performance loss. Great insulation without ceiling air sealing may lead to moisture accumulation. Aim for a complete system where structure, insulation, air control, and ventilation align.
Cost, code, and measured performance
The cost of specifying raised-heel trusses is modest compared to the performance benefits. In many regions, truss plants price the heel increase as a minor upcharge related to extra webbing and plate length. Field labor changes are minimal: you’re still setting trusses and sheathing as usual, with added time for baffles and dams that most crews already install in some form. For many projects, total added cost falls into the “no-brainer” category when weighed against energy savings and long-term durability.
Energy codes increasingly recognize the importance of full-depth insulation at the eaves. If you’re aiming for compliance with strict performance targets, the raised heel gives you a straightforward path. Many jurisdictions using recent IECC editions or above-code programs (like ENERGY STAR, Passive House, and utility incentives) explicitly encourage details that preserve insulation thickness at the perimeter. Documenting full-depth coverage and ventilation continuity often unlocks rebates or verification credits.
Performance-wise, expect your effective roof R-value to align much more closely with labeled values. Without a raised heel, the edge loss can drop whole-roof performance by several R points—sometimes more than 10% in cold climates. Restoring the edge thickness pays dividends in comfort at exterior rooms and reduces the risk of ice dams where snow accumulates and melts over warm eaves.
Use the following guide to match heel height with insulation type and target R-values. The clear vent space assumes a 1.5 inch baffle; adjust for products with different thickness. Always verify with your designer and truss engineer.
| Target R-value at eave | Insulation type | Approx. full thickness required | Suggested heel height (incl. 1.5 in vent space) |
|---|---|---|---|
| R-38 | Blown fiberglass | ~12 inches | 13.5–14 inches |
| R-49 | Blown cellulose | ~14–15 inches | 15.5–17 inches |
| R-60 | Blown fiberglass high-loft | ~17–18 inches | 18.5–20 inches |
| R-60 | Cellulose dense-blown | ~16–17 inches | 17.5–19 inches |
These dimensions are guides; product density, settling characteristics, and manufacturer specs affect final depth. In all cases, keep the baffle height above the insulation by at least 6 inches to prevent wind washing at the top edge, especially in vented soffit zones subject to gusts.
In heavy snow zones, raised-heel trusses also play well with exterior ice-dam defenses: ice-and-water shield membranes, robust ridge vent designs, and deeper soffits that keep vents clear of drifting snow. Because the heel keeps the eave region cooler, you often reduce reliance on electric heat cables and other band-aid solutions.
Structural and fastening considerations
The increased lever arm at the heel means uplift and lateral forces may be slightly different than with a low heel. Truss engineers typically address this with plate sizing and web configuration. At the field level, coordinate with your structural notes for:
- Truss-to-top-plate connectors (hurricane ties or strap systems) sized per design wind speed and exposure.
- Solid blocking or raised energy-heel blocking panels that transfer compression and provide nailing for the baffle and dam.
- Sheathing nailing patterns at the eave; some specs call for closer on-center spacing at edges in high-wind zones.
Noise control is a bonus. By preserving full insulation depth at the perimeter, you quiet edge rooms where traffic and exterior noise enter easily. If sound is a priority, combine the raised heel with airtight, gasketed drywall and a sealed access hatch to minimize acoustic leaks.
Moisture, vapor, and air—keep the layers straight
In a vented attic, the ceiling plane is your primary air barrier. Above it, ventilation carries away incidental moisture that sneaks past the ceiling. With raised-heel trusses, it becomes easier to maintain a continuous, inspectable air barrier because the geometry is simpler at the eave. If your climate or building program calls for a vapor retarder, consider a variable-perm membrane or vapor-smart paint on the ceiling. This allows drying toward the interior during shoulder seasons while controlling vapor drive in winter.
At penetrations—bath fans, HRV/ERV ducts, plumbing vents—use gasketed boots and mastic or foam to tie the penetrations to the air barrier. Seal the attic access with weatherstripping and insulation; a leaky hatch can negate the gains you worked for at the eaves.
Retrofits: can I add a raised heel later? Converting conventional trusses to a raised heel after the fact is not generally feasible. However, you can mimic some benefits by installing rigid insulation baffles that step up and create a higher dam, then dense-pack to the edge without compression. Combine with meticulous ceiling air sealing and you’ll see meaningful improvements, though not as strong as a true raised-heel truss.
Coordinating with exterior details
Deeper eaves may alter fascia and soffit alignment. Most raised-heel designs leave the exterior appearance unchanged, but verify that soffit vent products and fascia trims accommodate the extra interior height. In retrofits, ensure gutters still pitch correctly and downspouts remain clear of landscaping.
FAQ
No. The heel height increases at the bearing point, but your roof pitch and ridgeline remain the same. From the street, most installations look identical to conventional trusses unless you choose to deepen the soffit profile for design reasons.
No. The heel height increases at the bearing point, but your roof pitch and ridgeline remain the same. From the street, most installations look identical to conventional trusses unless you choose to deepen the soffit profile for design reasons.
For R-49 with blown cellulose, plan around 14 to 15 inches of insulation plus 1.5 inches of vent space. A 15.5 to 17 inch heel usually works well. Confirm with your insulation installer and truss engineer to account for product density and any baffle thickness.
For R-49 with blown cellulose, plan around 14 to 15 inches of insulation plus 1.5 inches of vent space. A 15.5 to 17 inch heel usually works well. Confirm with your insulation installer and truss engineer to account for product density and any baffle thickness.
Yes. Keeping full insulation thickness at the eaves cuts heat loss that melts roof snow from below. Combine raised heels with airtight ceilings, balanced ventilation, and an ice-and-water membrane at the eaves for best results in heavy snow regions.
Yes. Keeping full insulation thickness at the eaves cuts heat loss that melts roof snow from below. Combine raised heels with airtight ceilings, balanced ventilation, and an ice-and-water membrane at the eaves for best results in heavy snow regions.
Exterior foam above the deck is excellent but adds cost, height, and detailing complexity. Raised-heel trusses are simpler to integrate with a vented attic: they preserve full insulation at the perimeter with minimal change to the rest of the assembly. In some high-performance projects, both strategies are combined.
Exterior foam above the deck is excellent but adds cost, height, and detailing complexity. Raised-heel trusses are simpler to integrate with a vented attic: they preserve full insulation at the perimeter with minimal change to the rest of the assembly. In some high-performance projects, both strategies are combined.
Standard continuous soffit vent products are typically fine as long as net free area meets code and the baffle maintains a clear path. Choose durable, rigid baffles that extend above the insulation surface to prevent wind washing. In wildfire-prone regions, consider ember-resistant vents that meet WUI requirements.
Standard continuous soffit vent products are typically fine as long as net free area meets code and the baffle maintains a clear path. Choose durable, rigid baffles that extend above the insulation surface to prevent wind washing. In wildfire-prone regions, consider ember-resistant vents that meet WUI requirements.